Entrate nel mondo di VivoSim e OpenSim in soli 4 semplici passi!
![]() 1 - Creare un avatar virtuale e configurare il software per accedere ai mondi.
1 - Creare un avatar virtuale e configurare il software per accedere ai mondi.
![]() 2 - Imparare a muoversi e interagire con il mondo virtuale.
2 - Imparare a muoversi e interagire con il mondo virtuale.
![]() 3 - Creare un account per il sito web.
3 - Creare un account per il sito web.
![]() 4 - Collegare l'avatar all'account del sito web.
4 - Collegare l'avatar all'account del sito web.
 1 - Creare un avatar virtuale e configurare il software per accedere ai mondi.
Per prima cosa è necessario un account per il mondo virtuale. Se ne avete già uno, potete saltare il prossimo paragrafo. Potete collegare un avatar da qualsiasi griglia, ma se avete intenzione di creare un nuovo account vi conviene iniziare a crearne uno su OSGrid, che è una delle griglie più longeve. Vi forniremo degli esempi per l'utilizzo di un account OSGrid, ma dovreste essere in grado di trovare le informazioni necessarie per la vostra griglia se ne utilizzate una diversa. Potreste anche creare un account gratuito su Wolf Territories, una griglia più recente ma già ben gestita (visitate il sito https://www.wolf-grid.com).
Per OSGrid, aprite il vostro webrowser su https://www.osgrid.org e selezionate di creare un account. Scegliete un nome per il vostro avatar, che potreste voler mantenere uguale a quello impostato per il vostro account sul sito web di VivoSim. Quando si crea un avatar si può scegliere un aspetto, ma è sempre possibile modificarlo in qualsiasi momento. Si noti tuttavia che su OSGrid e sulla maggior parte delle altre griglie, una volta creato un account non è generalmente possibile modificare il nome dell'avatar.
Ora avrete bisogno di un software che funga da visualizzatore di mondi virtuali: ce ne sono diversi tra cui scegliere, ma in questa guida utilizzeremo Firestorm, che potete scaricare qui. È disponibile per Windows, Mac e Linux. NOTA: Ci sono due versioni principali disponibili per Mac e Windows, la prima è solo per Second Life e non funziona con altre griglie. È consigliabile scaricare quella per OpenSim.
Firestorm viene fornito con molti mondi diversi preimpostati, ma se la vostra griglia non è presente nell'elenco, dovreste essere in grado di trovare le istruzioni per aggiungerla sul sito web della vostra griglia. I mondi virtuali che costruiscono VivoSim e altri luoghi sono nati da un mondo virtuale chiamato Second Life, quindi lo vedrete come predefinito all'avvio del software. Nel nostro esempio stiamo usando OSGrid, che è una delle opzioni integrate, quindi fate clic sul menu a tendina Grid e selezionate OSGrid dall'elenco.
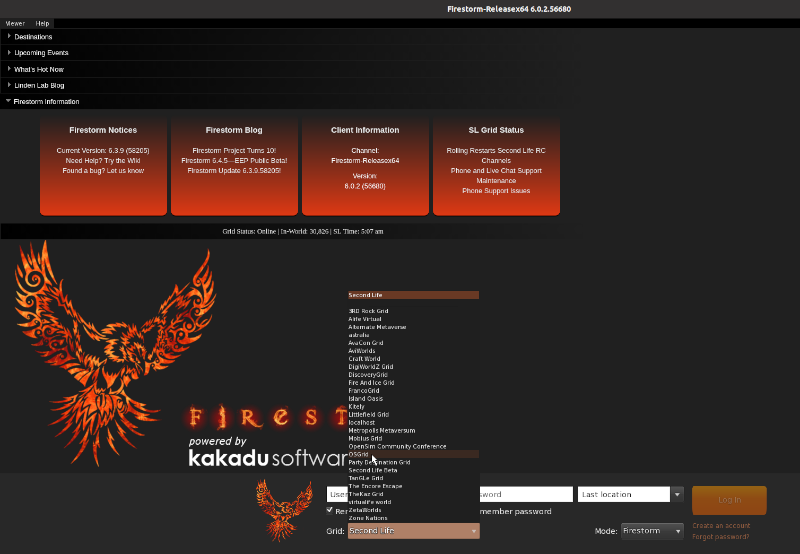
Dopo qualche secondo dovrebbe apparire la schermata di benvenuto di OSGrid.
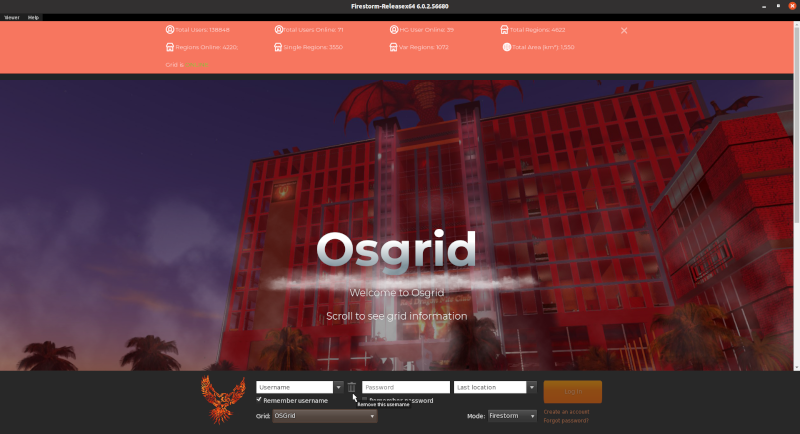
Ora digitate il nome del vostro avatar nella casella Nome utente, ad esempio John Smith, e la vostra password. Si consiglia di selezionare le opzioni Ricorda nome utente e Ricorda password. Se questo è il vostro primo accesso (emozionante!), vi suggeriamo di cambiare la posizione di accesso da Ultima posizione a Casa. Per il secondo e i successivi accessi si può scegliere di accedere all'ultima località o di digitare il nome di una regione.
Fare clic sul pulsante Accedi . Durante il primo accesso, potrebbe essere necessario un po' di tempo per la verifica, quindi è necessario contenere l'entusiasmo ancora per un po'!
Una volta completato l'accesso, dovreste trovarvi nel centro di benvenuto (la maggior parte delle griglie vi fa iniziare in un centro di benvenuto) e, si spera, avrete l'aspetto dell'avatar che avete selezionato durante la registrazione, se questa era un'opzione.

Nota: all'inizio potreste essere una nuvola arancione
arancione, ma questo dovrebbe cambiare dopo poco tempo.
L'area di benvenuto è generalmente impostata come Casa, quindi si può facilmente tornare qui usando il pulsante Casa in Firestorm  In seguito, man mano che si scoprono nuovi luoghi, si può spostare la propria casa in uno di quelli, se si preferisce.
 2 - Imparare a muoversi
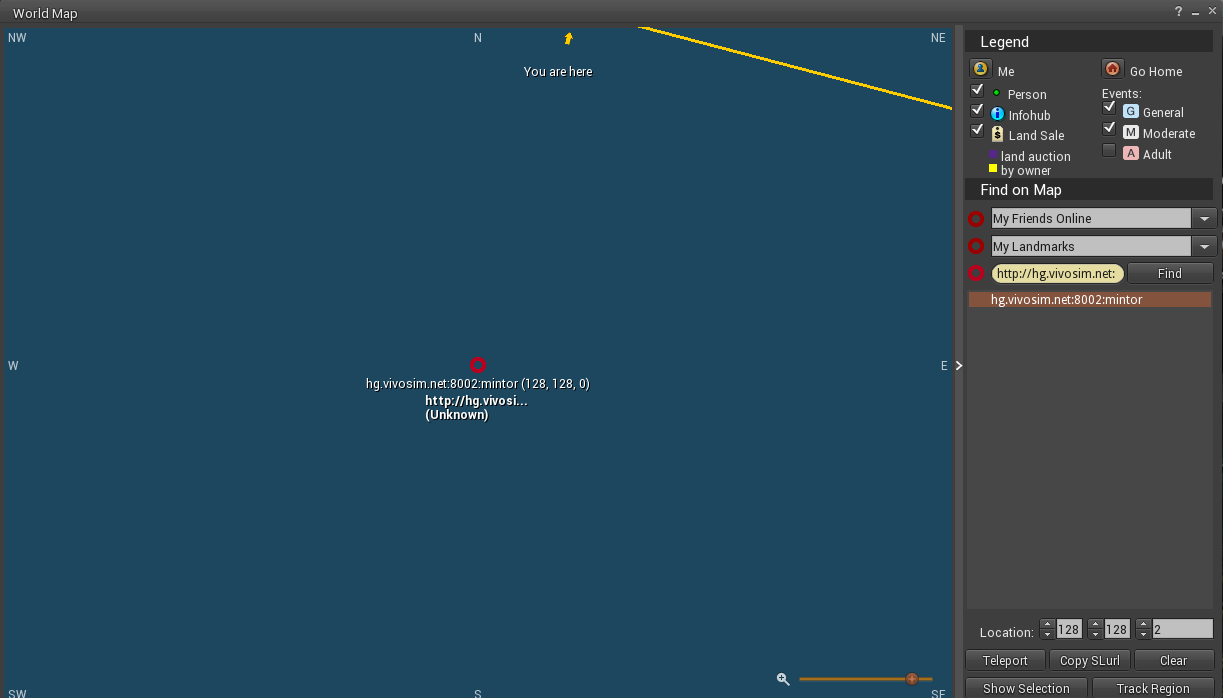
La maggior parte delle aree di benvenuto ha un sistema di orientamento o di tutorial per aiutarvi a muovervi e a capire come funzionano le cose, ma se la vostra non ce l'ha potete seguire la guida qui sotto dalla stanza del tutorial nella regione di Mintor. Per arrivarci, basta premere Ctrl M per aprire la mappa. Digitarehg.vivosim.net:8002:mintor nella casella Trova e premere il pulsante Trova. A questo punto è possibile premere il pulsante Teletrasporto per raggiungerlo.
Quando si arriva a Mintor, è sufficiente fare clic (toccare) la postazione di teletrasporto Tutorial e si verrà inviati alla stanza del tutorial.
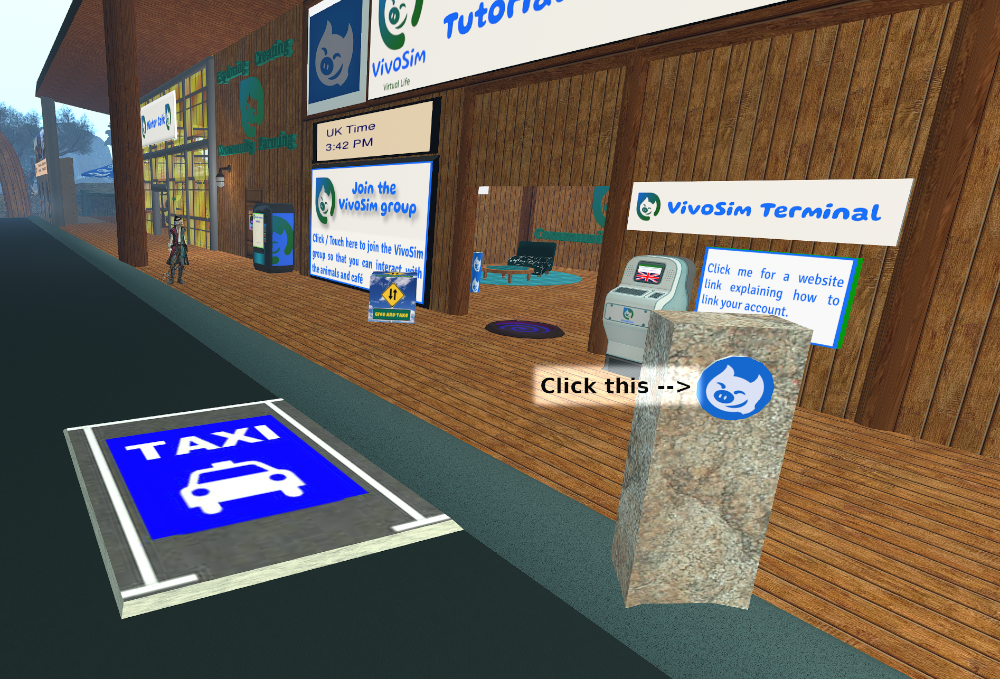
A questo punto dovreste trovarvi nell'area del tutorial di benvenuto e potete seguire il tutorial muovendovi tra le tavole numerate (e seguendo le frecce verdi), ma prima di iniziare potreste voler regolare alcune impostazioni nel visualizzatore di Firestorm come segue.
Si vedranno vari pulsanti nella parte inferiore dello schermo e uno al centro-sinistra. La prima cosa da fare è fare clic con il tasto destro del mouse sul pulsante con la F (il pulsante di Facebook) e selezionare Rimuovi questo pulsante. Il motivo è che il collegamento a Facebook non funziona con VivoSim (o altri mondi virtuali basati su OpenSimulator). Se si usa Second Life, il collegamento funziona, quindi è meglio tenerlo, ma altrimenti è solo un intralcio!

Nel menu è possibile selezionare icone, testo o entrambi, quindi è possibile impostare il modo più adatto alle proprie esigenze. Oltre ai pulsanti in basso, è possibile averli anche a sinistra e a destra e impostare la scelta del testo/icona separatamente per ciascuno di questi tre elementi. Per fare un po' più di spazio, potreste voler rimuovere il pulsante Chat bubble  , poiché il pulsante 'Nearby Chat' fa davvero la stessa cosa. Per il momento, probabilmente questo è sufficiente per i pulsanti, ma se siete tipi che amano giocare, fate clic con il pulsante destro del mouse e selezionate la voce Pulsanti della barra degli strumenti... per vedere tutti i pulsanti disponibili. È possibile aggiungerli o rimuoverli trascinandoli verso o da quella finestra.
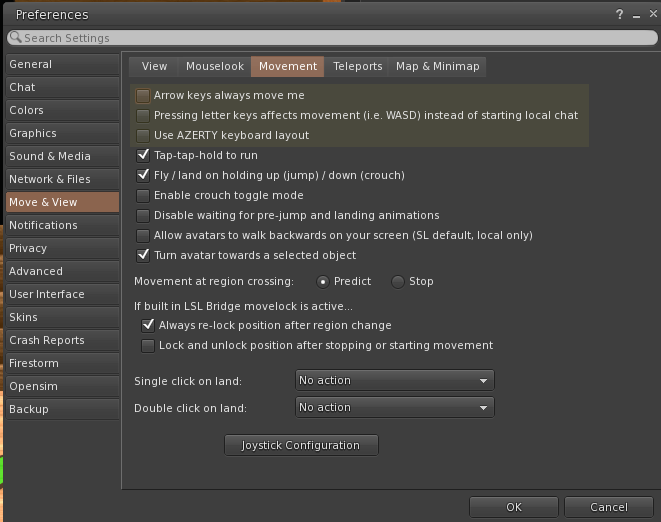
Per impostazione predefinita, Firestorm è impostato per utilizzare i tasti freccia per il movimento, ma se si preferisce utilizzare i tasti WASD sulla tastiera, è possibile impostarlo come segue:
Dal menu in alto, selezionate Avatar e poi Preferenze (se vi piacciono i tasti di scelta rapida, potete usare anche Ctrl-P). Quindi, a sinistra, selezionate Muovi e visualizza. Da qui fate clic su Movimento nella scheda superiore. Le prime tre voci riguardano il movimento. Selezionate la seconda(La pressione dei tasti lettera influisce sul movimento (cioè WASD) invece di avviare la chat locale) per utilizzare i tasti WASD.
Bene, ora è il momento di provare il tutorial nel mondo. Si spera che stiate guardando la tavola numero 1, che vi spiega come muovervi; in caso contrario, potete girarvi usando i tasti freccia sinistra o destra per ruotare (o A e D se avete impostato l'uso di WASD sopra). Notate anche che, a seconda dell'hardware grafico del vostro computer, potrebbe volerci un po' di tempo prima che tutto appaia (spesso chiamato "rezzing") la prima volta che visitate un luogo, quindi se non riuscite a vedere le parole sulla tavola, aspettate un po' e speriamo che appaiano per voi.
 3 - Create il vostro account sul sito web
È possibile registrarsi qui e creare un account che verrà utilizzato per accedere al sito. Il sito consente di condividere informazioni con gli altri, di chattare, di fare domande e di vedere i propri XP. Nel creare il proprio account, si sceglie un nome e un nome utente
Nome: è il nome con cui si desidera essere visti dagli altri sul sito. Spesso le persone usano lo stesso nome del loro avatar, ma si può scegliere qualsiasi nome. I nomi possono avere degli spazi, quindi se il vostro avatar si chiama John Smith, potete usare questo nome come nome.
Nome utente: è il nome che userete per accedere al sito, quindi è meglio che sia breve e memorabile. È visibile solo a voi e agli amministratori.
Durante la creazione dell'account, avrete anche la possibilità di fornire alcune informazioni per il vostro profilo. Potrete sempre aggiungerle/modificarle in seguito, se lo desiderate. Una volta completata la registrazione, riceverete un'e-mail con un link di attivazione dell'account che dovrete utilizzare per attivarlo.
 4 - Collegare l'avatar all'account VivoSim.net.
Accedere al sito web e dal menu selezionare Profilo, quindi Modifica profilo. fare clic su Nella pagina verrà visualizzata la chiave di collegamento, utilizzata per collegare l'avatar al proprio account web.
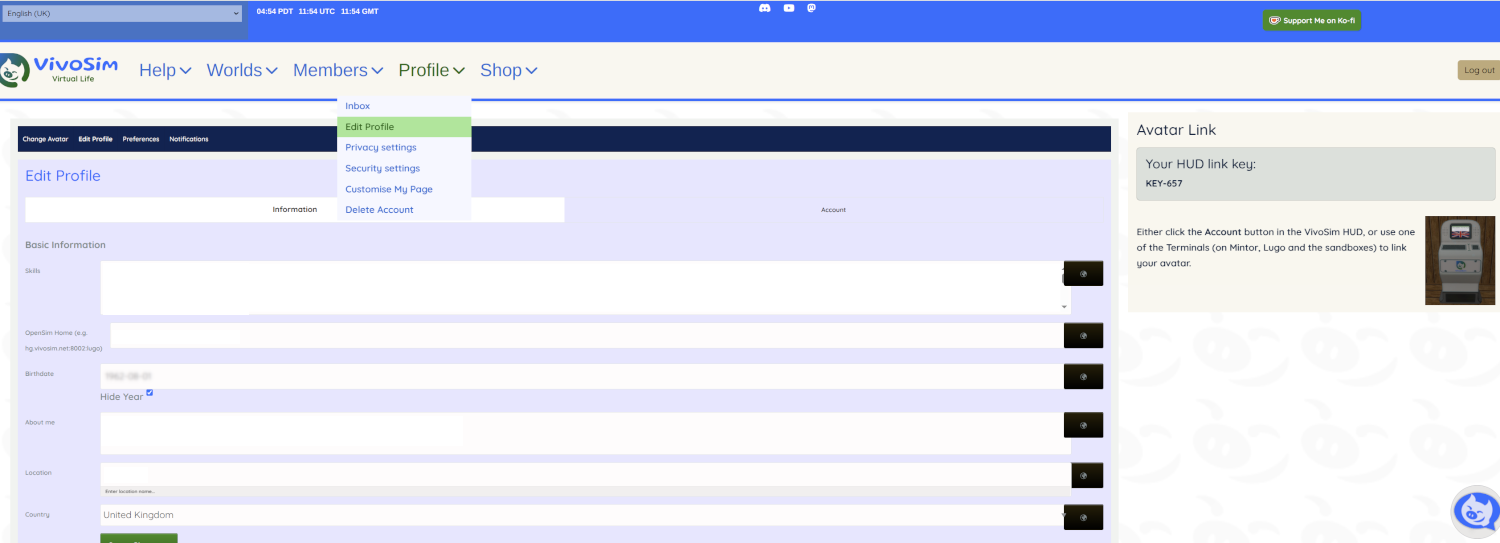
Per collegare il vostro avatar, accedete alla vostra griglia iniziale e poi potete usare un terminale in una delle regioni di VivoSim, oppure usare il vostro HUD per collegare il vostro account:
Terminale - Ci sono terminali in tutte le regioni di VivoSim, con il terminale principale nella regione di Mintor.
Per raggiungerlo, digitare hg.vivoim.net:8002:mintor nella sezione Trova della mappa e selezionare Teletrasporto.
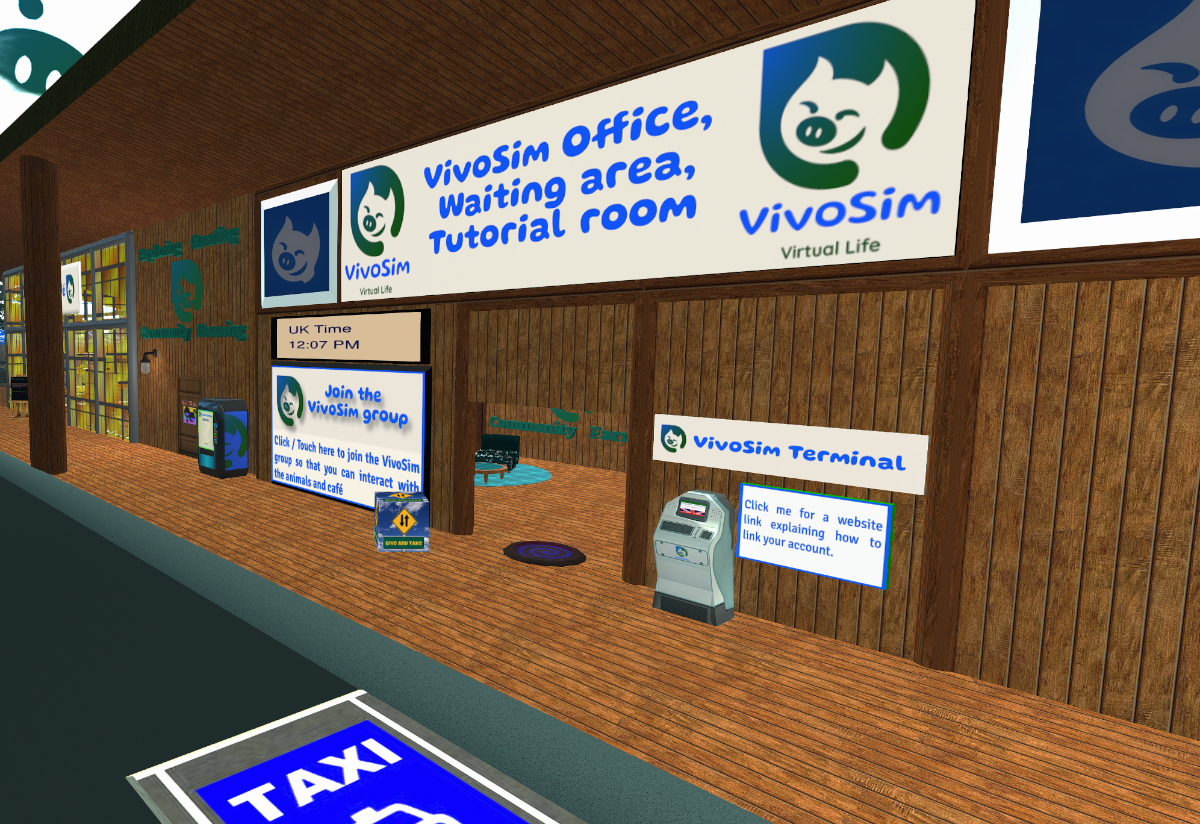
Il terminale si trova nell'area di benvenuto principale.
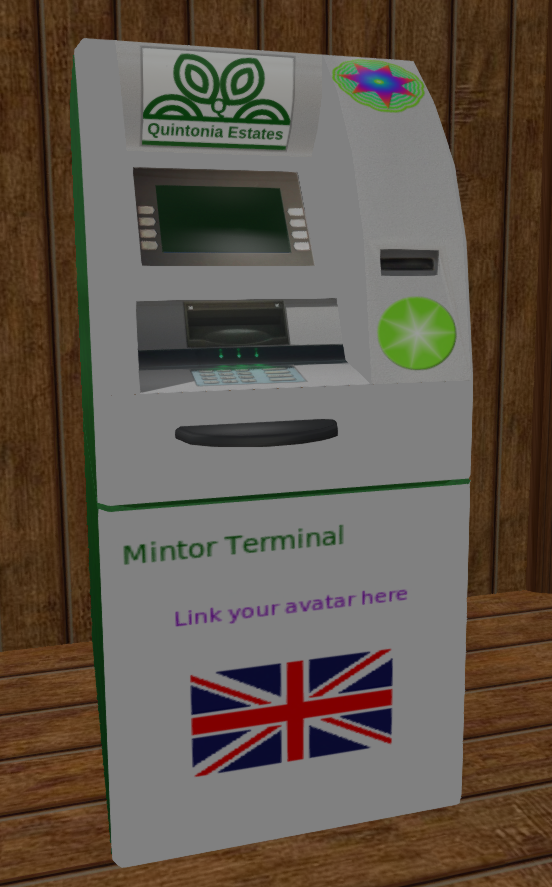
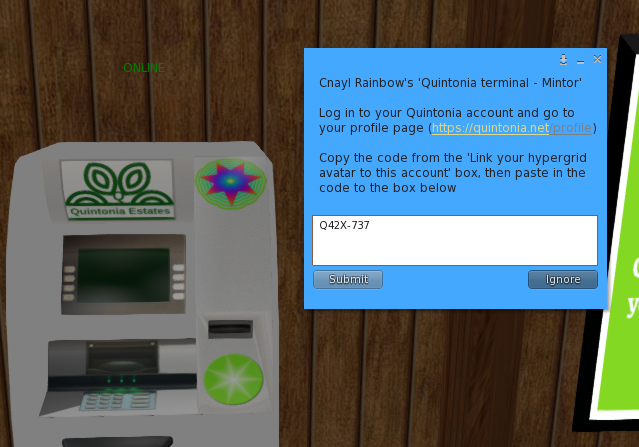
Toccate il terminale per visualizzare il menu (per cambiare la lingua cliccate sul pulsante @).
Dal menu, selezionare Account e poi Collega avatar
Inserite il codice di collegamento (di cui sopra) nella casella e premete il pulsante Invia.
Dovrebbe apparire un messaggio che indica che l'avatar è stato collegato. Potete confermarlo toccando di nuovo il terminale, selezionando Account e poi I miei punti.
HUD - La procedura è identica a quella descritta sopra, ma si clicca sul pulsante Account sul proprio HUD e poi su Link Account Si noti che è necessario trovarsi in un luogo in cui l'HUD funzioni, ad esempio nel proprio terreno agricolo, oppure si può utilizzare l'area Sandbox Learning Centre su Mintor.
Errori:
err: INVALID-EHai già un avatar collegato a questo account. Si può provare ad accedere con l'altro avatar e utilizzare prima l'opzione Un-link. Se non funziona, è possibile inviare un messaggio privato a Buzzy Cnayl sul sito web di VivoSim e fornire il codice del collegamento e la chiave (UUID) del nuovo avatar.
Errore: INVALID-JCan't find the matching account, please check the last three numbers of the link code you entered are correct and try again.
err: INVALID-QSiamo spiacenti, qualcosa è andato storto nei nostri sistemi; contattateci o aspettate un po' e poi riprovate.
Se avete domande, non esitate a contattarci o a consultare il forum. Abbiamo anche una FAQ ("domande frequenti") che potrebbe aiutarvi.

Quest'opera di Buzzy Cnayl è rilasciata sotto licenzaCreative Commons Attribuzione-Non commerciale-Condividi allo stesso modo 4.0 Internazionale.
Basato su un lavoro dihttps://satyrfarm.github.io/


